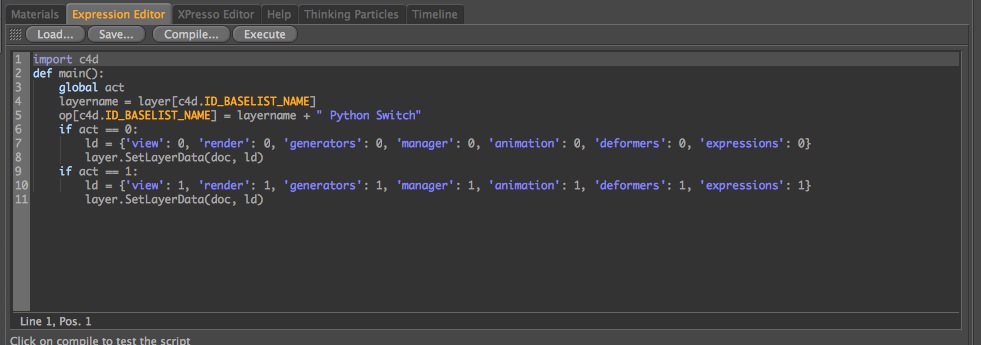
Inside the Python Node
Here’s a quick & handy little Xpresso node that’s essentially a compacted version of Niklas Rosenstein‘s Layer Access node.
It just has two slots – one to send in a layer, the other a switch to turn the entire layer on or off. Super basic, nothing complicated. Great for those big flythrough scenes where you need to do something like “Turn off all calculations on Layer X after frame 200”.
[download id=”121″ format=”basic”]
Originally I created it as a Python tag that would turn on or off the layer it’s parent object was a part of, but that went screwy fast if you wanted to have that particular layer hidden on your timeline – because the switch would disappear with the layer. Thus my adjustment to Xpresso, where I essentially wrote my own version of Niklas’ great tool.
Inside the Python Node
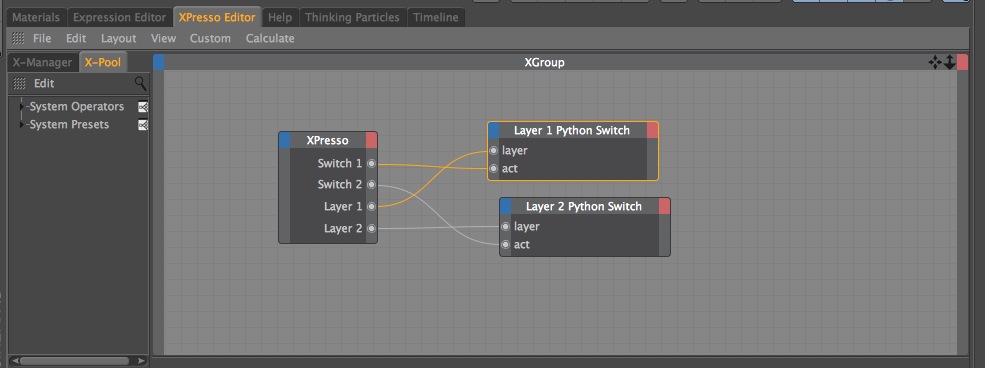
Xpresso side

Render Proxies
Using proxies is one of the best ways to speed up your workflow in Cinema 4D. Using simple geometry in the viewport allows you to navigate around your scene and animate your models very quickly. When it’s time to render, all one needs to do is quickly switch out your simple proxy geometry for the detailed, high resolution mesh and you’re off to the races.
Many users have developed fantastic workflows for performing the geometry swap. Over at helloluxx.com, Tim Clapham details how the instance object can be used to easily substitute proxy geo for render geo; and just recently Matt Frodsham wrote a great article on how one can use layers in conjunction with Niklas Rosenstein’s Layer Access Xpresso node to switch between the two.
An average proxy switch.
Both of these techniques make use of a boolean switch to turn the proxies on and off – hit the button to turn the proxies off and the high resolution geometry on, hit the button again to turn the proxies back on and the high res geo off. Very simple.
So simple in fact, that I often forget to hit the button before rendering. I become so used to working with the proxies in the viewport that the button fades to the back of my memory, only to come flying back when I try a test render.
Wouldn’t it be nice if that was done automatically at render time? You work with the proxies in the viewport, hit render, and voila: your high resolution geometry automatically appears in the picture viewer!
Well it turns out our solution is rather simple. The workflow is based around Florian Sepp’s FS Preview Accelerator plugin, which can automatically turn cloners on & off at render time. With a little bit of Xpresso, we can repurpose this to switch out our proxies at render time.
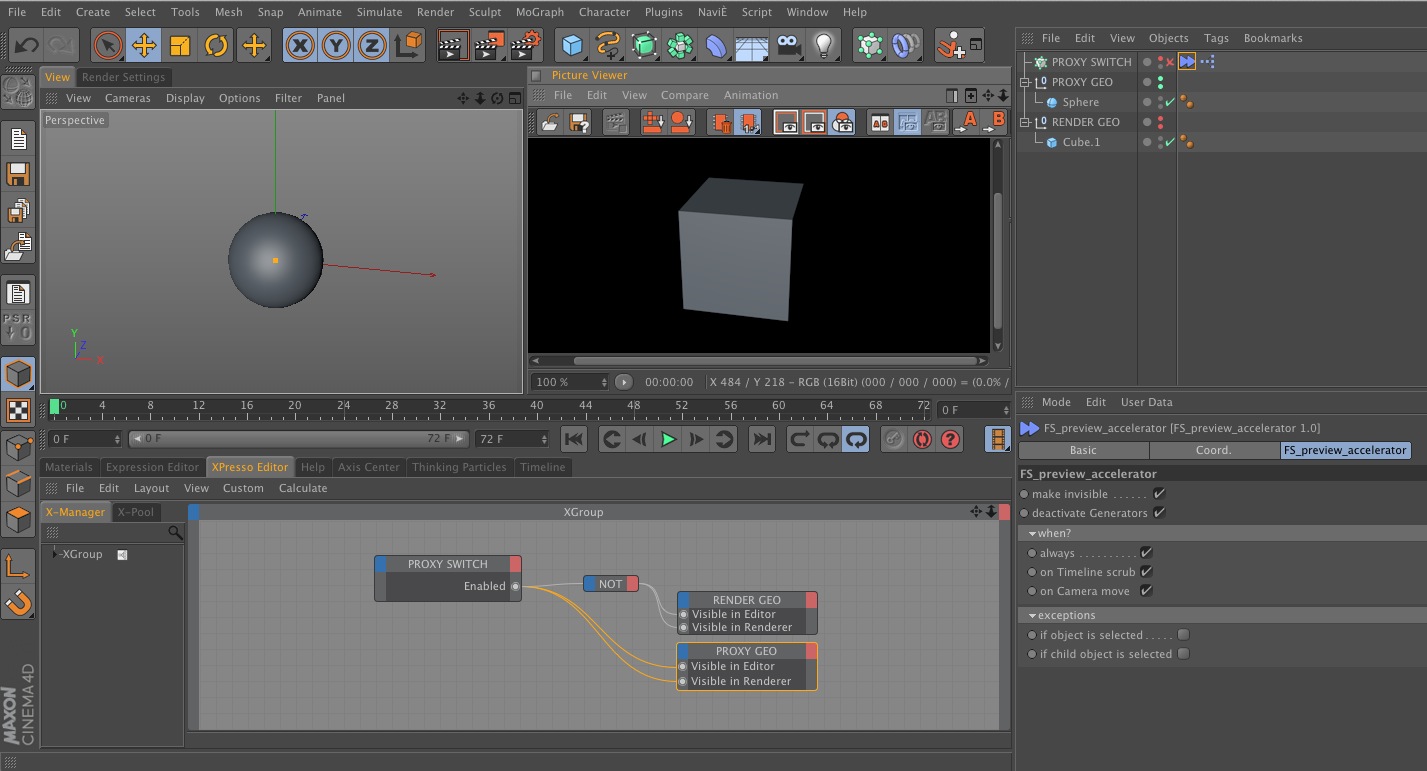
The render time proxy workflow.
The above screenshot demonstrates the workflow; our FS Preview Accelerator tag sits on the cloner object, automatically disabling the cloner while we’re in the viewport and re-enabling it when we render to the picture viewer. Once brought into our Xpresso window, the cloner’s “Enabled” port under Basic Properties becomes our switch: outputting a value of 0 when we’re in the editor, and outputting a value of 1 once we hit render to picture viewer. We wire this up to our “Visible in Editor” & “Visible in Render” ports of our proxy & render geometry, and we’re good to go.
Download the [download id=”73″ format=”basic”] – Requires the FS_Preview_Accelerator Plugin.
To get FS_Preview_Accelerator, go to Florian Sepp’s website, click on “Downloads” on the top bar, and scroll down until you see the “FS_Preview_Accelerator” plug-in.
You could combine this workflow with the Layer Access Xpresso node to have a “Proxy” layer and a “Render” Layer – then all you’d have to do is add your proxy geo to the proxy layer and the render geo to the render layer, and it would automatically turn them on & off at render time.
This basic technique has quite a bit of potential in other areas of C4D as well – I’d love to hear what you come up with!
Thanks for reading,
Luke
The Global and Local Matrixes within Cinema 4D can be both lifesavers and death eaters at the same time. A recent project forced me to learn more about them, and I thought I’d pass along some of that knowledge to you.
The first thing I discovered was that you can can convert a Normal Vector into a matrix by use of the Vector2Matrix xpresso node found within the xpresso nodelist under New Node –> Xpresso –> Calculate. Robert Leger has a fantastic guide on the node, which you can find here.
But a problem quickly arose: when I set this new matrix as the Global Matrix of an object, the object locked itself to the origin of my scene (position 0,0,0).
After spending many hours consulting the C4D Python help guide and experimenting on my own, I figured out both the cause of the problem and a method of fixing it.
In Cinema 4D, a matrix is composed of three vectors named V1, V2, and V3. When used as a Global or Local Matrix, these three vectors contain the rotation and scale values associated with the object. In addition, every Global and Local Matrix contains a fourth Vector called ‘Offset’ (abbreviated as ‘off’); this Vector contains the position values of the object.
Therefore, if one converts a normal vector to a matrix, and wishes to use said matrix as the global matrix, the Offset Vector needs to be changed.
To accomplish this task, I created the Matrix Splice xpresso node.

The node is very easy to use: first, feed your current matrix to the ‘Matrix’ input of the node, then feed the Global Position value you’d like to splice into the matrix into the ‘Position’ input. Your new and improved Matrix can be accessed from the “New Matrix” output tab.
Download link:
[download id=”4″ format=”basic”]
To install on OS X, drop the XMA file into the following location: User –> Library –> Preferences –> MAXON –> Cinema 4D [Your Version] –> Library –> xgroup.
Once it’s placed in that folder, you can access the node within your Xpresso Editor window by clicking on File (the ‘File’ button in your Xpresso window, not the ‘File” button located at the top left of your monitor) –> Load X-group.
If you have any trouble with it, let me know.
—
Luke