
Render Proxies
Render Proxies
Using proxies is one of the best ways to speed up your workflow in Cinema 4D. Using simple geometry in the viewport allows you to navigate around your scene and animate your models very quickly. When it’s time to render, all one needs to do is quickly switch out your simple proxy geometry for the detailed, high resolution mesh and you’re off to the races.
Many users have developed fantastic workflows for performing the geometry swap. Over at helloluxx.com, Tim Clapham details how the instance object can be used to easily substitute proxy geo for render geo; and just recently Matt Frodsham wrote a great article on how one can use layers in conjunction with Niklas Rosenstein’s Layer Access Xpresso node to switch between the two.
An average proxy switch.
Both of these techniques make use of a boolean switch to turn the proxies on and off – hit the button to turn the proxies off and the high resolution geometry on, hit the button again to turn the proxies back on and the high res geo off. Very simple.
So simple in fact, that I often forget to hit the button before rendering. I become so used to working with the proxies in the viewport that the button fades to the back of my memory, only to come flying back when I try a test render.
Wouldn’t it be nice if that was done automatically at render time? You work with the proxies in the viewport, hit render, and voila: your high resolution geometry automatically appears in the picture viewer!
Well it turns out our solution is rather simple. The workflow is based around Florian Sepp’s FS Preview Accelerator plugin, which can automatically turn cloners on & off at render time. With a little bit of Xpresso, we can repurpose this to switch out our proxies at render time.
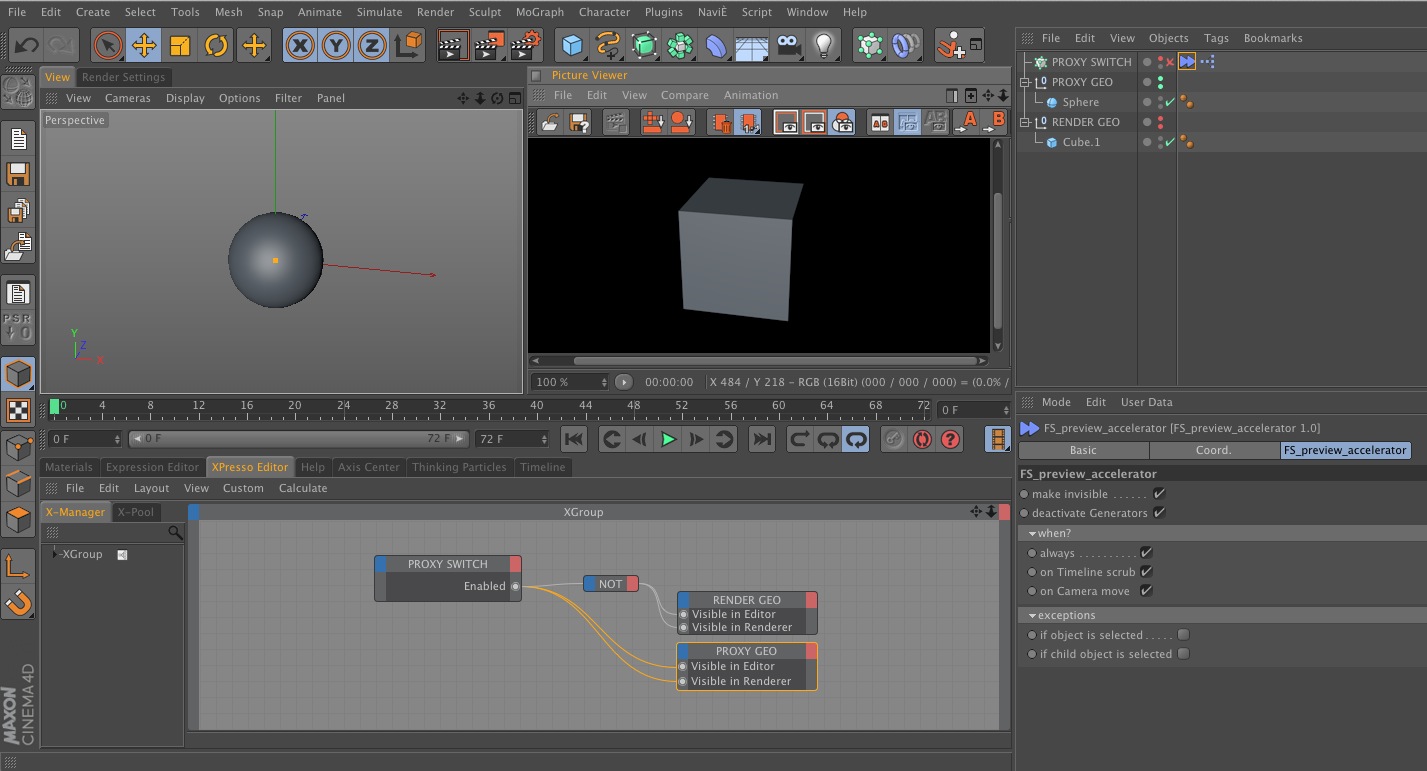
The render time proxy workflow.
The above screenshot demonstrates the workflow; our FS Preview Accelerator tag sits on the cloner object, automatically disabling the cloner while we’re in the viewport and re-enabling it when we render to the picture viewer. Once brought into our Xpresso window, the cloner’s “Enabled” port under Basic Properties becomes our switch: outputting a value of 0 when we’re in the editor, and outputting a value of 1 once we hit render to picture viewer. We wire this up to our “Visible in Editor” & “Visible in Render” ports of our proxy & render geometry, and we’re good to go.
Download the [download id=”73″ format=”basic”] – Requires the FS_Preview_Accelerator Plugin.
To get FS_Preview_Accelerator, go to Florian Sepp’s website, click on “Downloads” on the top bar, and scroll down until you see the “FS_Preview_Accelerator” plug-in.
You could combine this workflow with the Layer Access Xpresso node to have a “Proxy” layer and a “Render” Layer – then all you’d have to do is add your proxy geo to the proxy layer and the render geo to the render layer, and it would automatically turn them on & off at render time.
This basic technique has quite a bit of potential in other areas of C4D as well – I’d love to hear what you come up with!
Thanks for reading,
Luke